Whether you are hosting a birthday party, a Valentine’s Day celebration or a baby shower, an approach will be using a balloon. The very best part is making a balloon garland is simple and enjoyable!
In the modern DIY manual, find out to make a DIY Balloon Garland.
I had been raised in a balloon & party distribution enterprise, although this may surprise you to understand. As the Company Manager for household’s 45-year old manufacturing and wholesaling business, Creative Balloons Mfg., balloons and parties have always been part of my daily life.
The most inspirational part of my job is utilizing our products to decorate for particular parties. As an individual, I adored fun DIY jobs. That is why I was eager to make this DIY Balloon Garland Tutorial with Celebrity Balloons (that can be only available from Creative Balloons Mfg. on Amazon).
This will produce the many eye-catching and “organic-looking” balloon garland.
DIY Balloon Garland Tutorial
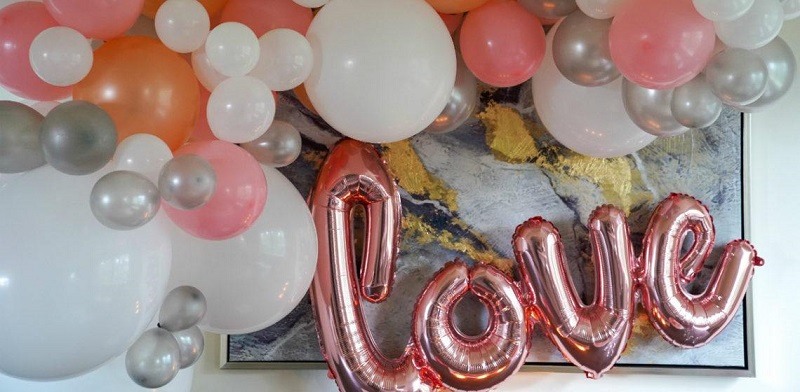
Step 1: Shop for Celebrity Balloons on Amazon from Creative Balloons Mfg. in a variety of different colors and sizes. When creating a DIY Balloon Garland, I recommend using mini 5″, 9″, 12″, 16″, and jumbo 36″ balloons. This will create the most eye-catching and “organic-looking” balloon garland.
Pro Suggestion: This line of balloons is durable enough to be used in a balloon garland (or other kinds of balloon installments). That celebration experts and balloon decorators use Celebrity Balloons out of Creative Balloons Mfg.
Step 2: Inflate balloons with air by means of a handheld inflator (for miniature and regular sized balloons) along with also an electrical air inflator (for big balloons). Tie a knot at every balloon’s neck.
Vary by color and dimension as you move up the strip. Notice: The 5″ miniature balloons will be connected afterwards.
Step 3: Using a clear balloon decorating strip, attach the neck of the balloon to the strip. Start by attaching the regular sized latex balloons (9″ and 12″) and the large balloons (16″ and 36″). Vary by size and color as you go up the strip. Note: The 5″ mini balloons will be attached later.
Pro Suggestion: When you are producing the DIY Balloon Garland, I suggest stepping back to have a total perspective of this garland. This can help you visualize that which sizes and balloon colors to utilize. There is no formulation — the more creative you are. Contemporary balloon garlands possess a natural look.
Step 4: If most of your balloon garland is completed, then it is time to fill in blank spaces with an 5″ miniature balloons. To make this step easier for you, rather than utilizing a low-temp hot glue gun (which many tutorials would imply), I suggest utilizing adhesive dots. The miniature balloons into the balloon garland pressing both balloons and firmly by sticking it.
Step 5: as soon as the DIY Balloon Garland is finished, attach a couple removable, self-adhesive hooks into the wall. Without damaging the wall after the celebration is finished, you may get rid of the balloon hooks and garland socket.
Optional: Another current trend in celebration balloons is that the usage of letter-shaped foil balloons. As revealed previously, there has been a Love script foil affixed beneath the balloon garland. This generated a background for your Valentine’s Day party featured here. You are able to use quantity and letter ranging into BABY from I DO, based on the sort of party you are hosting.